This post is from design team member and contributing writer Jean Manis.

Perhaps you’ve seen Copic markers referenced in a supply list for a scrapbook layout or a card, or maybe you’ve seen them at Michaels or at an online retailer and wondered “What’s different about those markers than regular markers?â€
The differences between Copic markers and other markers are plentiful, beginning with the way in which Copic markers, which are alcohol-based, blend with one another, creating effects that cannot be reproduced with those “other†markers. These blending qualities make Copics easy to work with for beginners as well as experts.
I fell into the world of Copic markers when I took an online course with Michelle Houghton through Get It Scrapped. Michelle’s course provided instruction along with downloadable digital images, which could be added to scrapbook layouts or to cards once colored with Copic markers. Although the first image I attempted to color left me frustrated, I soon got the hang of the process and have been hooked ever since. In fact, I find coloring images with Copic markers to be therapeutic and relaxing despite my perfectionist tendencies; Copic markers are a forgiving medium.
I am by no means an artist or an expert on Copic coloring, nor is this article intended to serve as a substitute for Copic instruction. My goal is to suggest some strategies for giving Copic coloring a try without a large initial investment of time or money. At a retail price ranging from $5-7, Copic markers are not inexpensive. On the plus side, the markers are refillable.
Where to Begin
Rather than do a lot of research upfront, my advice is simple–try coloring a relatively simple image with a few Copic markers and see whether you enjoy the process.
For starters, you need an image to color. That image can either be a digital stamp you’ve printed with a laser writer printer (because the inks in most inkjets are not compatible with the Copic ink) or an image you’ve stamped with a clear or rubber stamp using a Copic-compatible ink. I use Tsukineko – Memento – Fade Resistant Dye Ink Pad on Neenah Classic Crest Solar White cardstock.
You need an image that outlines an area that can be colored. You aren’t stamping with the markers. In fact, Copics cannot be used to stamp an image and the Copic ink would discolor your stamp.
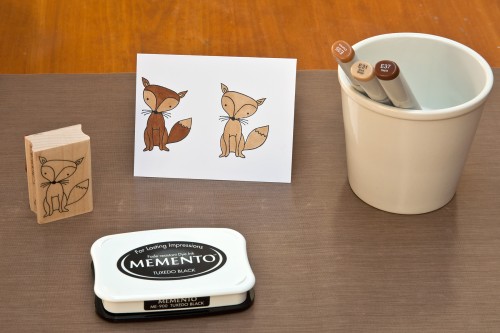
I’ve selected this Hero Arts fox stamp.

I like this particular stamp for beginning coloring because it’s just right in size. A stamp with smaller coloring areas would pose a challenge. I also like the fact that the fox’s body is subdivided into different sections, making it easy to color it with different colors.
Using only Brick Beige E31, I colored the fox. With Copic coloring you’ll begin with your lightest color. To apply the color evenly, use a circular motion. The fox could be used on a card or as an embellishment colored with just one color. However, to make the image a little more interesting, I colored in some of the sections with Chamois E35.Â
The fox could be used on a card or as an embellishment colored with just one color. However, to make the image a little more interesting, I colored in some of the sections with Chamois E35. 

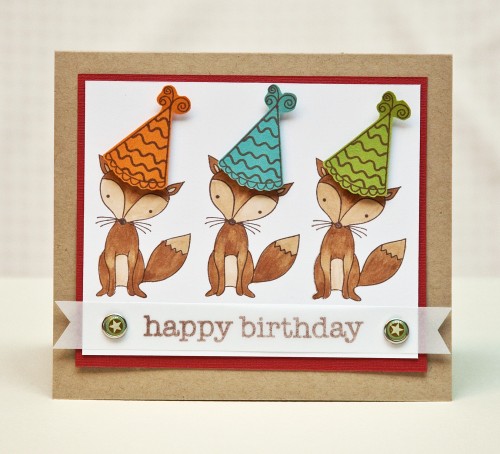
Wanting to be a bit more adventurous, I stamped the fox three times (this time with brown Memento ink) and colored the image with a third Copic color. I guessed a bit at the shading for the foxes’ bodies. I added stamped birthday hats and sentiment to create a birthday card. Even without a lot of coloring expertise, I can create cards with colored images.

Once you’ve tried a simple project, there are several suggested next steps (assuming you enjoyed the process enough to continue with your learning):
Take a Class
Online Copic Marker Classes for Fall 2011 with Michelle Houghton at Get It Scrapped
Online Courses with Suzanne J. Dean at Color Me Creative Classroom
Online Copic Markers for Beginners with Sandy Hulsart at My Creative Classroom (begins Sept 29, 2011)
Copic Certification at various US locations
Learn from Online Tutorials
There is an abundance of fantastic and free information online–avail yourself of it. You’ll be able to see the many different types of images–faces, clothing, animals, inanimate objects, foliage–that can be Copic-colored, as well as learn tips and techniques.
Blog of Marianne Walker, product specialist/product director for Copic Markers
Copics information from Michelle Houghton including more than twenty tutorials with free downloadable images
Copic projects from Ellen Hutson and her CLASSroom instructors
Scrapbook Stamping Series at Two Peas with Nichol Magouirk, June 2011 lesson (includes a video)
Read a Book
- Annie’s Attic – Idea Book – Copic Coloring Guide
- Copic – Shadows and Shading – A Beginner’s Guide to Lighting Placement
Copic Retailers
Additional Resources
- Copic FAQ, Color Charts & Tutorials
- Copic FAQs
- 6 Tips for Getting Started with Copic Markers by Michelle Houghton
- The Copic Markers You Need in Your Starter Set by Michelle Houghton
I still have a long way to go with my Copic marker education. I’m following my own advice by studying tutorials and taking more classes. Every image I color, I see improvement in my skills. I have a list of techniques I want to learn including how to shade black, how to color white, and how to shadow without an example.
If you’re sitting on the fence about Copic markers–what’s holding you back? What information about Copics are you interested in knowing more about? Got a resource about Copics that I haven’t listed, please share!


Jean you are a sweetheart! Thanks for sharing all my info!
Hi! I have another brand of markers.. you think the tutorials would work with them too? I have the letraset ones.
Hi Amalia, I don’t have any experience with the Letraset markers so I don’t know whether the blending principles are the same. I would look at some of the tutorials and see if they work. Also you can google for Letraset tutorials and I’m sure you’ll find something!
Jean, you did a great job on this starter tutorial! I can answer Amelia’s question if that is OK. I have actually experimented with about 10 different alcohol marker brands including Letdaset. All of them have similar characteristics. And all at some level blend. I found the Letraset markers a little tougher to work with but if you go back and forth with your layers and your blending you can get them to work. You could use Copic tutorials knowing that you will have to adapt colors and might have to work a little more at the blending. Hope that helps! Great job Jean!
Michelle Houghton