In this guest post team member Julie Aldridge beautifully showcases how simple it is to use a template to create a traditional scrapbook page.
I’m a paper scrapper. I don’t mind being on the computer a little, but I like to get my hands dirty and play with paper, embellishments, patterns, and colors. I like to dig into my craft space and be inspired. I like to keep things simple.
And I am obsessed with templates.
Templates make my creative process easier. They have revolutionized the way I scrapbook. My pages are quicker and easier because the bulk of the work is done for me. Instead of staring at an empty, blank page, I use a template and finish my project in 3 steps. Quick, easy, clean, and simple.
Step 1: Pre-Planning/Design
My first step is always to set up my design. This requires a little pre-planning. Don’t be scared, all I’m doing here is asking myself, what am I going to make? Usually, I either start with a template or photo that I have in mind. In the following example, I started with a template for 4×6 photos because I had a HUGE stack of 4×6 pictures that I wanted to use. Here’s the template:
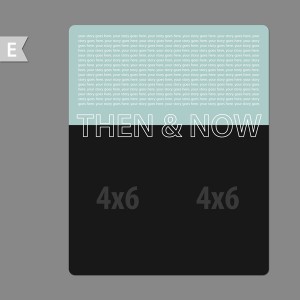
Looking through my stack of pictures, I found one that I loved and wanted to use. Unfortunately, the template calls for 2 pictures, and was titled ‘Then and Now’. I nixed the ‘Then and Now’ title since that’s not what I was going to do. Next, I decided to replace the second image with a journaling card. Since my journaling was now planned, I removed the text. Ta-Da! The design was finished!
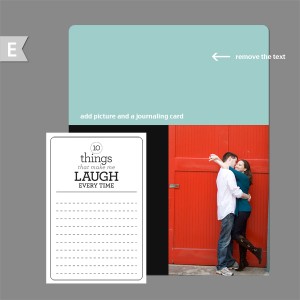
Step 2: Print
This is the easiest step! Since my picture was already printed, I just printed out the journalling card.
Step 3: Play
With the pictures and journalling card printed, I pulled out my paper and embellishments and looked for complementary colors. I almost always use neutrals and try to stick as closely to the template as I can. After all, I’m trying to make this easier for myself!
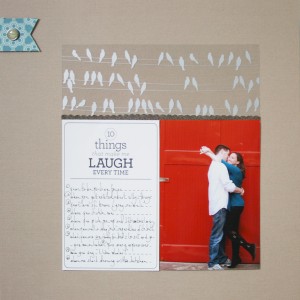
Materials: Solid paper is Quicksand by Bazzill Basics; screen print paper is Birds on a Wire by Hambly Screen Prints; flag made with Book Jacket/Memoir Collection by Studio Calico; scalloped stripe made with Letterset/Calico Classic Collection by Studio Calico; Brad by Crate Paper; journal card uses Cathy Zielske’s design from DesignerDigitals.com; template by Simple Scrapper Premium Membership; photo taken by Brooke Turner Photography.
This method works for all sorts of templates, and I use it consistently every time I make a page.
For more complex templates, I’ll use Photoshop/Photoshop Elements to pre-plan my design by dragging and dropping my pictures into a template that Simple Scrapper’s Premium Membership provides [Step 1].
Then I’ll print the 12×12 picture directly through a company like Persnickity Prints. Within a week, I have beautiful 12×12 pictures at my doorstep with the pictures already in place [Step 2]. All I need to do then is add paper and embellishments [Step 3].
For further reading, check out the pages made by the design team for July’s Challenge to see more examples of Simple Scrapper Premium Membership templates in use and stop by my own blog to see my method put in action.

glad to get a little inside look at how this all happens. I am a few steps more complex but pretty much have the same flow. LOVE your style and this post is golden.
Great post! Love the way you made the template work for your photo and journaling.